PERFECTLY IMPERFECT-I may not be the best at what I do, but Nobody has MORE fun trying than I do! :)


Wednesday, October 13, 2010

Letters, Tissue, & Splatters- 3 More 21 Secrets Projects

I have been busy with workshops and projects, and there are paper snips, tissue scraps, and paint spatters all over the dining room and me to prove it! LOL But I am having soooooooo much fun and learning so much! I attended my eighth workshop this morning, but haven't done the project yet. I decided to share numbers 5,6, & 7 with you first. The scanner doesn't pick everything up real good, but you get the idea!


The two above are from the "Layers of Tissue" workshop I took with Hanna Andersson. I used pages from the Doodlicious Daybook I created in the second class with Tracie Hanson to add tissue elements to. I love it! Now I know why I've been saving pretty tissue paper all this time! :)


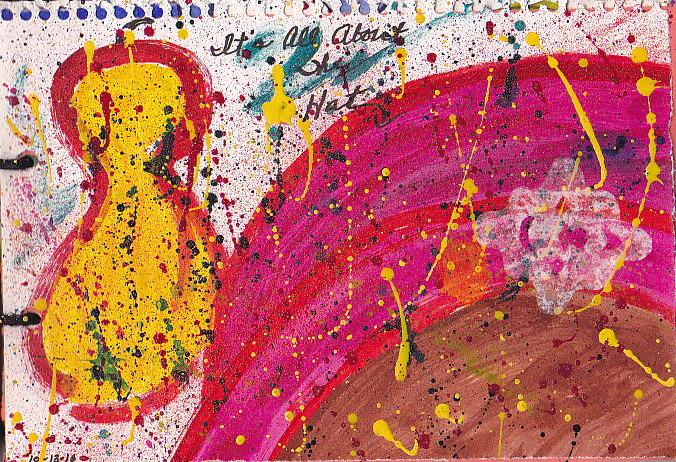
These two pages, also in my Doodlicious Daybook journal, are from the "Positive and Negative of Splatters" with Johnathan "Blade" Manning. Throwing paint off a brush, or whatever, definitely helps get rid of any frustration that I might have had. What fun! :)


This page is in my Moleskine journal and is the project from "Typoholic" with Natalie Malik, where I studied different lettering techniques to use in journaling. I used the sole of my houseshoe for a stamp, then added lettering and paint spatters for fun.

There are spaces left on all the pages for me to write my thoughts down in when I'm ready. Meanwhile I'm so thankful to Connie at Dirty Footprints Studio for putting all these workshops together in one place for us to learn more about art journaling. Loving every second of it! :)

Saturday, October 9, 2010

Chinese Paper Cut Journal Pages

I used each of the paper cuttings on one of the Doodlicious journal pages this morning with text. I glued the butterfly on one of my doodle drawings and added text, then I used the flower? as a stencil on another page with text. I see things that I could do better, but, hey, I learned from these pages to be more careful where and how to place my text, so it's all good. :)


Click to enlarge and be sure to read the text around the center to finish the thought. The flower is stenciled onto the scrapbook paper background with red fluid acrylic paint and embellished with a gold calligraphy pen and a silver paper clip.

The butterfly is cut from scrapbooking paper and glued on to one of my doodle pages.

I am having more fun than ought to be legal learning new things! I look so forward to attending class every day in these workshops! :)

Friday, October 8, 2010

More Paper Cutting...

I've been practicing more paper cutting!


The two above were cut out of coffee filters without a pattern. I just started cutting. The outside edge was cut with scissors with a patterned edge. The rest was cut with embroidery scissors.

The two below were cut with a pattern out of rice paper using embroidery scissors. This could be addictive! :)

Can't wait to use these in my journal!

21 Secrets-Chinese Paper Cutting-4th Workshop

 Butterfly

These are from my fourth workshop in the 21 Secrets Playground (see sidebar), Chinese Paper Cutting Meets Modern Art Journal with Emma Peabody. There were two patterns for us to practice on, a butterfly and a flower. I totally messed up the first butterfly I tried (the pink one above) by running the detail cuts together. I did much better on the second one, but I still need more practice. These can be used in lots of ways that Emma shared.
 Okay, the pink flower (above) went completely awry! I really do like the design and how it turned out, although I probably couldn't do it again if I tried. LOL
Flower

This is how the flower was supposed to look! It's all in the folding! I figured out that I folded one fold wrong, which rendered a completely different design. I also learned that the thicker paper is MUCH harder to cut, so from now on I'll be sure to use THIN paper. I used scrapbook paper on all but the flower, and it worked great. I used a cardstock decorative paper on the flower. Usable, but much harder to cut and not as delicate.

I know exactly where I'm going to use these too-in my Doodlicious art journal! :) 

I can't wait to design some of my own using delicate papers, like coffee filters...

21 Secrets-Doodlicious Daybook-Proj 3


First we doodled large on large paper (I used what I had-18x24" drawing paper).
Wish I'd had bigger paper. It was so freeing, doing the large doodles!
The pictures are of my workshop project, Doodlicious Daybook, with Tracie Hanson in the 21 Secrets Playground (see sidebar). She had an awesome video and she shared lots of ideas. I've had more fun making this journal than I can even tell you, and I will definitely be making more!

Then we cut the large doodles into smaller blocks (mine are 6x9") to make the pages. We also cut pages from scrapbook paper, brown paper bags, envelopes, etc, plus we took different colored cardstock, etc and did paint swipes in different colors and textures to add variety to the book.

The pages were turned back to back and mixed with the othr pages, however I wanted to place them. I picked out covers and laminated them (Recognize the cover from my large doodle?), then punched two holes in the pages and used a black leather cord to bind them together for now...

The next four pictures are a sampling of the pages within the journal. These will have writing, smaller papers, pockets, more painting/drawing, etc added to them eventually. I was actually supposed to do that before I punched the holes, but I chose to wait. That will be a great project to do while watching TV or when I only have a few minutes.  I have a lot of ideas!  Meanwhile, the leather cord keeps the pages together, and I can easily take them out to work on them if I need to.


I will try to share pictures with you as I embellish the pages...

                                          The back cover of my art journal...but not THE END! :)

Tuesday, October 5, 2010

21 Secrets-The Secret of Beginning

"Her Character Grew Out Of Her Imperfections"-Isn't it fun how the last word fell imperfectly off the page? That wasn't planned, but I like it. :)

I could do a lot more to this journal page, but I like it where it is right now, so I stopped. This is my second project in the playground class "The Secret of Beginning" with Lisa Wilson. The class was about techniques and supplies to get started art journaling. Wish the copper glitter and paper clips had scanned better. Oh, well, on to the next class!

These classes are wonderful. You don't have to take them in any particular order and there are videos, pdf files to print off, discussion rooms, places to show and tell, and tons of inspiration and ideas. They are well worth the money and registration is open until Dec. 1. The playground closes Feb. 1, 2011. Can you tell I'm excited?!!! The next class I've chosen is doodling very large on large paper, then making a book for journaling out of it. I've already been to video class, which was awesome. Can't wait to get started on the project!

Monday, October 4, 2010

21 Secrets Playground-I AM MAGIC-My First Project


I just discovered that this post became unpublished for some reason. It was actually the first project and post in these workshops a few posts ago.
My first project with Dirty Footprints Studio's  21 secrets -I Am Magic with Andrea Schroeder. It was fun finding the magic within me, and there is glue and glitter everywhere to prove it. :)

I just wish the silver glitter and the purple marker showed up better in the scan, so you could see all of the magic. If you click on the picture you can see it better, but still not as pretty as it really is.  I enjoyed the whole process so much. Thanks Andrea! :)