PERFECTLY IMPERFECT-I may not be the best at what I do, but Nobody has MORE fun trying than I do! :)


Showing posts with label gelatin prints. Show all posts

Saturday, November 17, 2012

Things I've Been Playing With This Week

I'm thankful that I like to dabble in a lot of different things. I never get bored or lack for something fun to entertain myself with. I've been dabbling with several things since I last posted. Following are a few of the works in progress that I'm working on.


Dollie Doll's paper sculpted face is coming along slowly. Can't wait to see her in hair and makeup! She will be a 36" cloth boudoir doll when she is finished.


A granny square afghan that I started around 15 years ago, hated sewing the squares together, got bored, and left laying until last week. I suddenly decided to finish it. I now have half the rows completed. I still HATE sewing the squares together! lol This is my first, and probably my last, granny square project. :/


I watched a paper cloth tutorial by Diana Trout and decided to give it a try. The bottom one is my first attempt and the top one my second. The cloth I used on the first one was a little too thick, but came out ok. I also used paper towels where I had wiped paint up, tissue paper, a phone book page that I had drawn a face on, a cut paper flower, and some rice paper on them. Now I can hand sew or machine stitch on them and use them in other projects. Since I was learning, I just used materials I had in reach, but I look forward to making some more using better materials.

 
I did a quirky doodle sketch just for fun! It took a while for the image to show itself amongst the pencil lines!


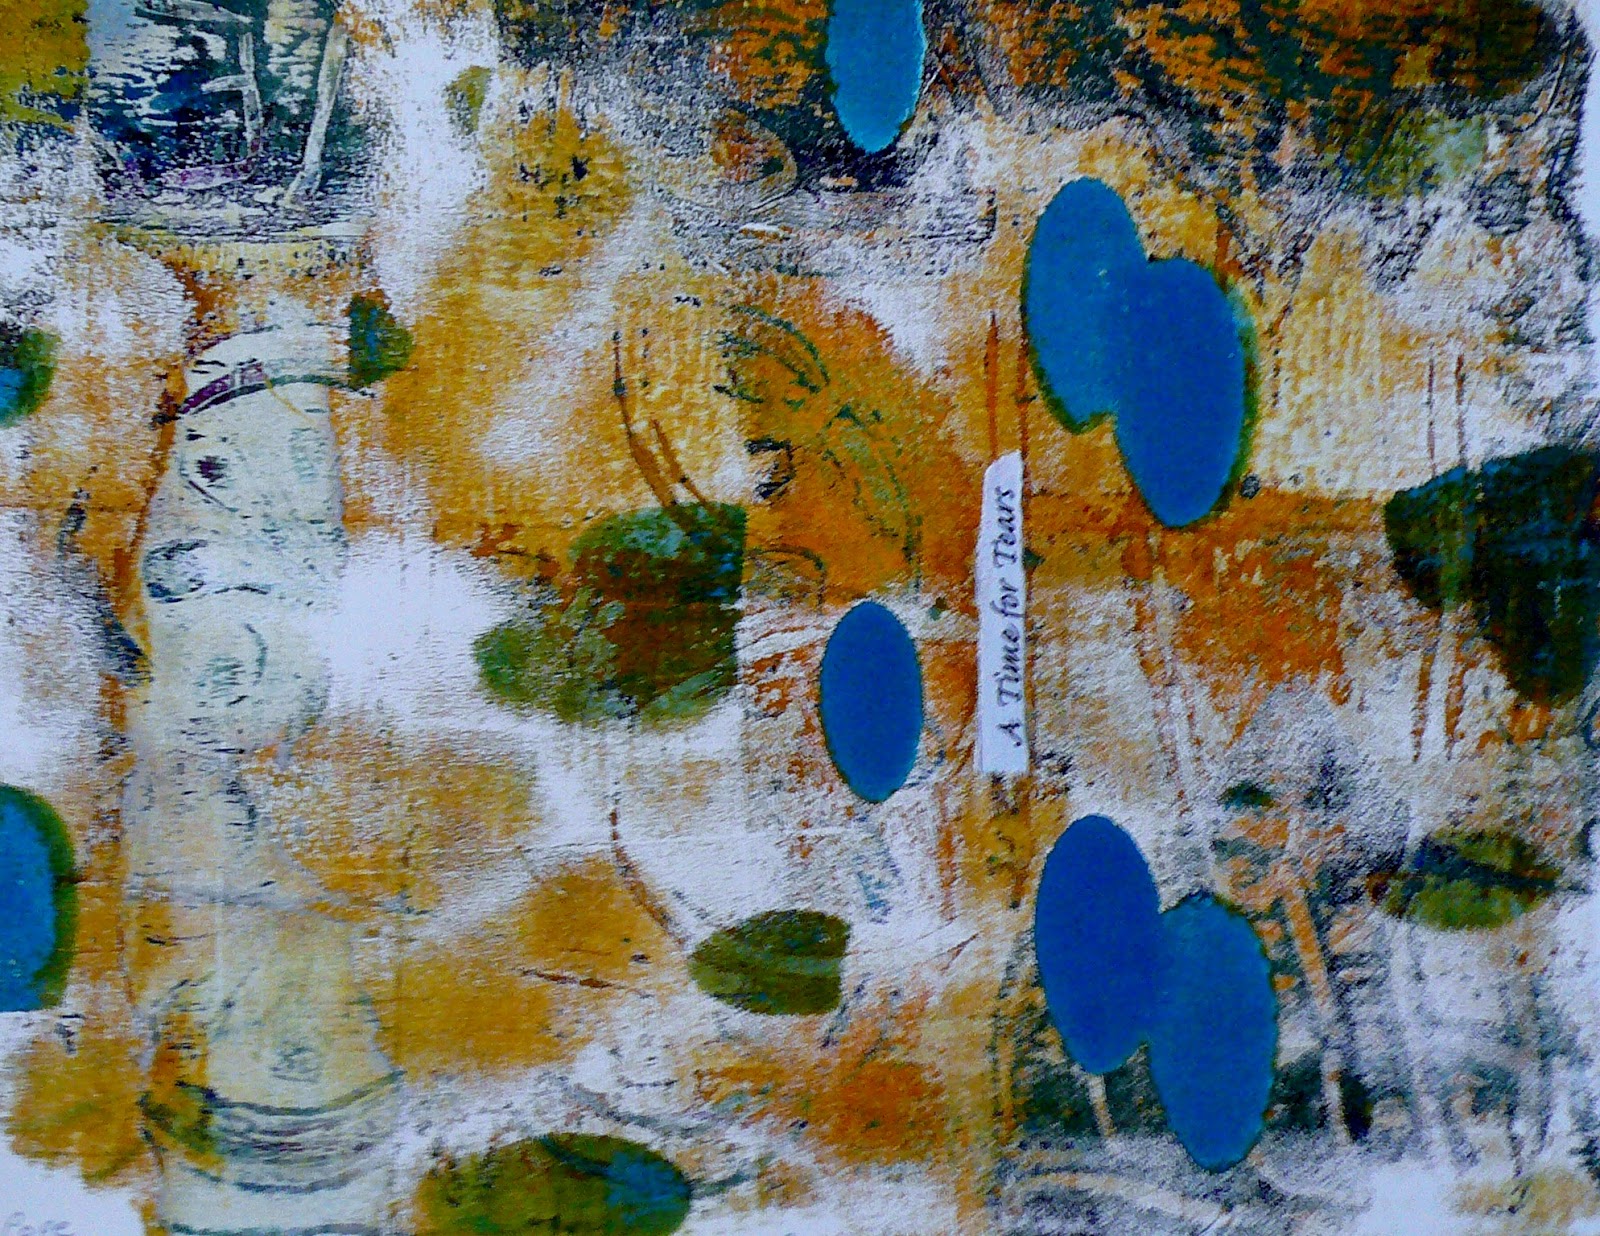
Playing and experimenting with my new gelli arts gel printing plate. These are a few of my trials, most of them are on toned card stock. I used stencils as masks and stamps on some. The browns on most of them is actually metallic copper, and I used mostly fluid acrylics and some heavier acrylics, whatever I could reach at the time.


Can you see the little copper stars in the blue around the butterfly above?


Metallic copper in the background on the butterfly above.


Metallic copper and turquoise. The stars are from the sole of an old house shoe, hence the footprint look.


A page of text that I had drawn a doodle face on with a marker. I used the stencil, after I pulled it from the plate, as a stamp to make her a mask. She looks a little wonky doesn't she?


Metallic copper, blue, and magenta in layers above.


Metallic copper and ultramarine blue above. The heart shape is cut from a clean piece of turkey netting.

 
"A Time For Tears" is a few layers of turquoise, yellow ochre, olive green, and it picked up some color and line off the previous print, which gave it some added texture and depth. I collaged the text with the title on top. I'm thinking I may add a layer of wax over it. I'm not a great photographer, and it looks better in person. I love it!

Hope you've enjoyed seeing what I'm playing with as much as I've enjoyed the playing!

Happy Thanksgiving to all of you who celebrate it, safe travels, and enjoy your family and friends!

Tuesday, October 30, 2012

What I'm Working On Part Two

Here is the rest of what I'm working on (playing with actually). I couldn't get the pictures to upload yesterday! :/


Learning to use my Gelli Arts gel printing plate. The harlequin prints at the bottom were my first attempts. The others quickly followed. It's hard to stop, once you get the hang of it. These are a few of the ones using stencils and acrylic paints (the ones in arm's reach) that I've made. They can be used to journal on, as a base for mixed media stuff, cut up and used in collage or art journaling, or whatever other ideas one can come up with. Fun!


This is a mini booklet using one folded sheet of paper that I learned in Dina Meyer's workshop in this session of 21 Secrets. These would make awesome poetry booklets. I made the white one in class, the the blue one the other day. I discovered this morning that not only are there two covers and six pages to journal on, but if I paint both sides of the paper before folding I will also have two 3-sided pockets and two 2-sided pockets between the pages to hold stuff. How fun is that?!!

Tuesday, February 28, 2012

Life Rings Journal Pages with Poem


More journal pages inspired by Misty's workshop. The life rings are comparable to tree growth rings, which, in my case, are 62 around. Then I needed a poem or story to go with. I don't claim to be a poet, but I gave it a try, and I used a gelatin print background page from another class to write it on with a Pitt pen. I glued the page into the journal with gel medium, transferred the bird from a magazine image onto the page. I need more practice. The transfer didn't turn out as well as I wanted, so I added some pastels and colored pencils to fill in the places that didn't transfer. I also added a couple of small stamps and colored them with colored pencils.

I am pondering adding something to the right upper corner, but I can't think of anything I want to put there. Besides, for now, I like it like it is. :)

The poem is in typed version at the bottom of the post. 

The bird is holding a tiny pink heart carefully in his beak. The heart represents my birth and first ring of life. I was born in my Granny's house on a Tennessee riverbank a long time ago, and I've lived near the river my whole life, except for a couple of short periods when I was little.

My life has ebbed and flowed from these river banks for 62 years, just like the water lapping at the shores, every day the same, yet every day different.

Life Rings
By Sharon Prater Pope (Feb. 2012)

Sixty-two ripples
Spreading out from my Clifton riverbank birth rock,
Cast into life with abandon,
Each ripple encompassing
All of the people shuffling in and out through the years,
All that I learn and absorb,
The effect that I have on others,
The effect that they have on me.
Circling ever wider with each passing year,
Receding into the distance
Until I fade into oblivion
And all that remains is a faded memory
And the effect that I had on others
The short time I was here.


Wednesday, September 14, 2011

Gelatin Plate Monoprints


More gelatin plate print fun. This one didn't scan well. The colors are actually metallic copper and red, and it's actually pretty in reality. I drew into the paint on the plate with a cotton swab, then printed onto printmaking paper. The sheets are a little bigger than my scanner, so the lid kind of wrinkled the paper.


I used my finger to paint onto the plate for this one, and it was so much fun. I like the print too!

This is a ghost print of the one above. I like it even better than the first one!


Another ghost print where the paint left on the plate was drawn into with a cotton swab.


I used a plastic doily on the plate, but the paint was so thick that the print only picked up enough of it to resemble a ferris wheel, don't you think? I like it!


More cotton swab drawing into the paint on the plate.


More cotton swab drawing...


Ghost image paint with a feather drawn in with a brush handle...

Ghost image of the one above with the ferris wheel. I repressed the doily into the paint left on the plate.

These will all be cropped eventually and used in various ways. Some may be framed, other used for journals and/or collaging, etc.

I love the gelatin plate printing, and I've just found out that I can now buy one that stays ready to use. It's the Gelli Arts gel printing plate, and I know it can be ordered through Cloth Paper Scissors magazine. So when I get ready to play with these some more, maybe I can get one of these. I LOVE the feel of the gel and the give it has under the paper when I press it down on the paint with the real gelatin, but I'm going to have to try one of these.

The gelatin print fun is going for a rest for a while though. For the next month I'm going to be taking an online workshop from Katie Kendrick in mixed media techniques, called Layered Impressions. I'll share what I'm doing with y'all, hopefully as I do it, but if I get behind I'll try to catch up on the weekends.

Hope something on here brought a smile to your face. :)

Monday, September 5, 2011

Still Playing With Gelatin Prints

A few more of the prints I've pulled from a gelatin plate over the weekend. I made several more, but these are my favorites. So far, I have a total of 48 prints. Some will probably wind up as journal backgrounds and others will probably be cut up into smaller formats for other uses.

I made a smaller printing plate for these, which allowed for a white border on all four sides, even if they didn't get scanned that way. These happen to all be on printmaking paper.


Acrylic inks, using a plastic doily and an original stencil...


A ghost image of the first print, using a dog and fiber masks...


Acrylic inks, using a brush handle to draw into the ink...


Fluid acrylics, using a plastic doily and a wild turkey feather...


Acrylic inks, using an original cut out mask and a wild turkey feather...


Acrylic inks, using a plastic doily and a turkey feather...


Printer's ink, using the plastic doily, a bottle bottom, and brush handle writing...


Printer's ink, using an original mask and stencil...


Fluid acrylics, using the doily, a handmade stamp, and an original stencil...


Ghost image of the above print, using dog and tulip masks.

These are so much fun to make, and they look much better with a white border around them, so I can't wait to try a white mat on the ones I shared in the previous posts, where the print covered the whole paper.

I think I'm beginning to get the hang of it now! :)

Thursday, September 1, 2011

More Gelatin Prints...And a Boo Boo or Two


Okay, this is the first print I pulled off a new gelatin plate that I had mixed up, let set, covered with tin foil, and set in the fridge overnight. I used acrylic inks instead of the fluid acrylics I used on the others. The inks worked fine, but the gelatin plate was a disaster. When I removed the tin foil, it had stuck in one place to the gel, but didn't pull any off, so that was ok. The underside of the foil, however, was covered in condensation, which had dripped onto the gel. I dried it off with a paper towel and rolled the ink onto the plate, placed my objects, and pulled a print onto my speedball printmaking paper.

This print pulled off fine, and I like the colors and patterns, etc. I was tickled with how well the inks worked.


So I quickly pulled a ghost image. Not so tickled with the image, but it can still be used. By the way, I'm playing and experimenting, so I quickly cut the masks out myself. Didn't worry about making them perfect. :o


I tried different colors and layed a large bandage gauze across the left side for texture. Unfortunately, the gel didn't pick it up and I had a large blank white space on the print, so I re-inked that side of the plate, added some masks, and re-printed. I also used a piece of lace in the corner.

I like this one okay. But now the gel plate, despite my wiping it off between prints was getting really tacky. A thin layer of gel pulled off in spots onto the print.


I tried thalo green and metallic copper on this one with a mask and some eyelash yarn. I was so disgusted with the tacky gelatin that I didn't really try on this one, and when I pulled it up, the gelatin just started coming apart on me, and I was done with it. Threw it out the door! :/


I was still wanting to play, so I rolled inks directly onto the metal cookie sheet and pulled a print. I wouldn't want to make a lot of these, but it'll make a good background for something, and I see interesting shapes in it, so I'll keep it in my stash.

As for the gelatin printmaking, I'm not giving up. I figured out that the condensation from the foil added water to the gelatin, causing it to weaken and get tacky, so I know not to do that again! :o I didn't cover the plate I made before this one and it did fine for 2-3 days, although I overmixed my paints and the prints turned out a little muddy and blah. I'm going to make another gelatin plate and print another layer on top of some of my first ones for more interest. We'll see how that turns out!

Boo boos are great for learning and remembering what you learn! Don't be afraid to try! :)

Monday, August 29, 2011

More Gelatin Print Practice!

I made another batch of prints yesterday from the same gelatin plate I used before, only I managed to turn the gel over for a smoother side to print these. However, one of the places where I imprinted with a wooden ring on the first side came all the way through, and in pulling the prints it kept coming out, so I finally just left it out and let it be a white disk.

These are made playing with two different strands of fun yarns, a stencil, and a feather. Again, I used what was within easy reach. I can't wait until I get my workspace organized, so I can find what I need or want to use. I may, or may not, add to these prints sometime, but for now I'm just enjoying the process. I love the process!


Wish the feather quill had picked up! I may have to add one! This print is on Speedball printmaking paper; the rest are on rice paper. The rice paper is more absorbent than the printmaking paper and looks duller. I think I prefer the printmaking paper with the brighter colors, but I guess it depends on my mood, plus a mat will do wonders for any of them, I'm sure. :)


Ghost print left from the first print...


First print...


Ghost print pulled and flipped...


Ghost print after I rolled some paint over the yarn and feather...


First print...


Ghost print...


First print...


Ghost print-Doesn't the hole look like a medalion?

I retired the gelatin plate after this batch, because it was beginning to come apart anyway. I'm thinking I may try a round container for the gelatin plate next, kind of like a mandela. I'd like to try some smaller ones than these 9x12" ones. and some different papers, too, so we'll see what turns up next time. Be back later...