PERFECTLY IMPERFECT-I may not be the best at what I do, but Nobody has MORE fun trying than I do! :)


Showing posts with label Handmade books. Show all posts

Tuesday, October 30, 2012

What I'm Working On Part Two

Here is the rest of what I'm working on (playing with actually). I couldn't get the pictures to upload yesterday! :/


Learning to use my Gelli Arts gel printing plate. The harlequin prints at the bottom were my first attempts. The others quickly followed. It's hard to stop, once you get the hang of it. These are a few of the ones using stencils and acrylic paints (the ones in arm's reach) that I've made. They can be used to journal on, as a base for mixed media stuff, cut up and used in collage or art journaling, or whatever other ideas one can come up with. Fun!


This is a mini booklet using one folded sheet of paper that I learned in Dina Meyer's workshop in this session of 21 Secrets. These would make awesome poetry booklets. I made the white one in class, the the blue one the other day. I discovered this morning that not only are there two covers and six pages to journal on, but if I paint both sides of the paper before folding I will also have two 3-sided pockets and two 2-sided pockets between the pages to hold stuff. How fun is that?!!

Sunday, October 14, 2012

Recycled Cereal Box Journal

One of the new handmade journals I learned in this year’s 21 Secrets session with Alma Stoller in Child's Play 2. It's made from a recycled cereal box. This is only a quick mock-up to help me remember how to make a real one.

P1020086P1020087

I used textured scrapbooking paper for the covers. The binding is uneven stitching, which holds the signatures at staggered places inside. I can't wait to make one of these for real and add embellishments to the covers.

Sunday, August 5, 2012

21 Secrets Playground 2012

I was late joining the 21 Secrets Playground this session. It started in April and the classes will be available until Jan 1. I joined at the end of this week. You can click on the link to read about it and all the teachers and the classes they're teaching, all 21 of them. It's also on sale now, so that's a bonus. There's still time to sign up, and I can tell you there's a lot of things to learn there.

I did the classes a little differently this session. Instead of taking the classes and doing the work one at a time like I usually do, and because life is happening at warped speed right now, I have gone through all the classes, watched all the videos, read all the texts, and saved/printed off the pdfs in case something happens that I can't continue right now. I learned a lot just from doing that, but now for the fun part, to go back and actually do the projects. After all, the best way to learn something is by actually doing it, and that's the truth. :)

I did do these little mini projects that were relatively quick and easy because I just had to create something.


The little booklet made from a journal page background that I didn't particularly like is from a class with Dina Wakely called Intuitive Painted Layers, the paper cutouts are from a class with Alma Stoller called Child's Play 2, and the heart kleenex sculpture (was supposed to use toilet paper, but the kleenex was handy was from a class with Dale Anne Potter called Personal Acts of Kindness. These tiny projects were just a small portion of the classes, and I can't wait to do the rest!

I also did a journal page of doodles and a small mandala from the class Wisdom Circles with Dion Dior, but I forgot to take a picture. :/

There's also tons of inspiration in the forms of the photographs from the other members of the work they've done in the classes. Some awesome work being done, as well as playing, on the playground!

Tuesday, May 1, 2012

The Self Portrait Experience-21 Secrets 2011


The mixed media covers for a journal titled "Metophorical Me" that I did in Connie Hozvicka's 21 Secrets classes last year. It is to be filled with self portraits in various categories. I haven't gotten that far yet...but I will. :) Now that I'm seeing it on here, I'm not sure that I like the gesso I rubbed over it to tone it down. It looks a little chalky to me, at least moreso than I wanted. I'm thinking I may take some of the whiteness back off it. I do love the covers though, and look forward to adding the pages between them.


See the kitty in the lower corner? That's my favorite stamp, and I've lost it among all the clutter in my workspace. :/ Hoping I find it when I start organizing...


Friday, April 6, 2012

Shopping Trip and WIPS

I actually typed this whole post a few days ago, only to discover I was having internet problems and blogger hadn't saved most of it to publish. Interruptions kept me from finishing it until now. Hopefully, I will get it posted before I get interrupted again. :)

Tuesday, Mar 27, was our 42nd anniversary and hubby and I had a spontaneous day out, just the two of us. We couldn't decide what we wanted to do, if anything. We had to take some stuff to the bank in town, so after we dropped it off, we just started driving northwest and wound up an hour and a half later in one of the nearest large towns (or small city?) to us in a huge shopping center. The drive was beautiful and we chatted and laughed as we drove, just enjoying being together.


I had received a Hobby Lobby gift card for Christmas from our nephew and his family, so we went in Hobby Lobby for a few minutes, where I spent the gift card, plus a couple of extra dollars, on a crop-a-dile II. Then we had a delicious lunch at Ruby Tuesday's, which we relaxed and took out time with.


After lunch, I went to JoAnn's Fabrics while hubby went to a sporting good store. I found way more great things than I could afford, but I came home with a sheet of plastic canvas for stenciling, etc, a liquid gold leaf pen, a fabric bundle, a sample pack of glitter, a small silk pouch, mama some pipe cleaners, and a CPS magazine.


We enjoyed frozen yogurt at Sweet CeCe's, which was do-it-yourself and the NY Cheesecake yogurt with almond slivers was really good. That's the only shopping we did in the center, but on the way out of town, we stopped by a Goodwill store. It took some digging, but I found an unopened box of Anna Griffin print-it-yourself wedding invitations with background paper of navy/cream, invitation cards of cream with silver borders and rsvp cards to match, with navy ribbons and two sizes of envelopes. 25 of each. I also found two bundles of nice napkins, also unopened, and some unopened Disney stamps, all for about $8.00!


Close up of the smaller napkins. Metallic gold borders with black/white drawings of the four seasons, and the words are in German. There are about 25 of these. How cool is that?


The larger napkins, also about 25 in pkg, are about hankerchief sized and have a cloth like feel to them. I love the colors and vintage look! I have already used both napkins on journal pages, plus I have plenty to share in a stash swap when one comes along. I loved finding these treasures!

The drive home was beautiful also, and we got here safe and sound, plus hubby surprised me with a copy of the Cloth, Paper, Scissors book. It was a good day of bonding and we're grateful to still have each other and that we were able to enjoy the day just enjoying each other's company.


 These are a couple of projects in progress. The one above is a sleeve for my e-reader. I needlefelted some yarn samples onto the edge of a piece of needlefelted material, lined the inside with a colorful turquoise, black, and white cotton cat print, and used bookbinding thread to stitch the edges together. I still need to attach some sort of fastener to the top to keep the reader from sliding out in my purse, and I may or may not add an embellishment to the front. The needlefelted material is thick and soft enough to help protect the reader from bumps and bruises in my purse too.


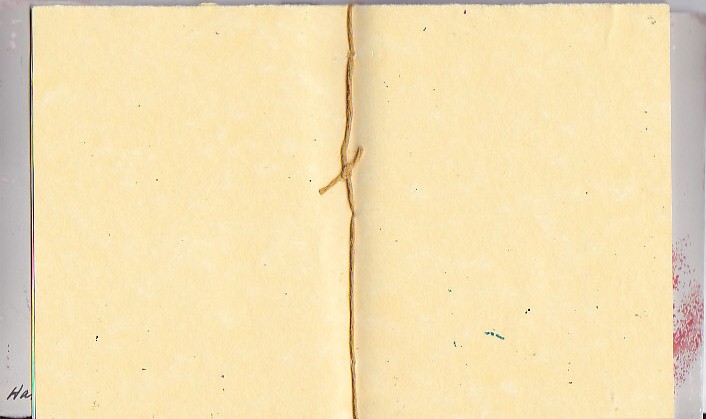
I had a 9x12" signature left over from the journal I made for Misty Mawn's class, so I cut it in half to make two smaller signatures. I used a scrap of canvas for a soft cover and stenciled on it with modelling paste, let it dry, and rubbed over it with titanium buff fluid acrylic paint. Enough of the pink was still wet enough to mix with it, giving it a pink tint.

The signature already had five holes punched in it, so I just went with it, and, using bookbinding thread, stitched them in in the uneven holes, giving a wonky look. I plan on carrying this one in my purse, so that's ok. It'll also be light, and if I need more signatures I can add them.


Since these pictures were made I practiced using the crop-a-dile to put little red eyelets on the edges of the closure. I kind of messed up the ones on the front, but I finally got the hang of it on the back ones. :) I tied a piece of the bookbinding thread through the center eyelet on each side, then tied it in a bow. I also added the title, Jots and Tittles, in black marker on the front. I will do some more to the covers when it tells me what else it needs. Right now I'm thinking I need to take some of the buff paint off the dancing ladies for a start?

Hope you enjoyed seeing what I came home with and some of what I'm working on. I sure am enjoying playing with everything. :) 

Tuesday, January 10, 2012

Another Journal With a Canvas Cover


Fronts-The brown one is the first one I made and shared a few days ago. I used spray ink and found stencils to do a background. The blue one I made Sunday and used found stencils and spray acrylic ink for the background, then stenciled with a brush through some brass stencils in metallic copper.

 I learned to make these from Misty Mawn pre-Open Studio workshop. The brown one has three signatures of printmaking paper, and the blue one has five signatures of mixed media paper.


Backs- This is just the beginning background on the covers. There will be more doodling and embellishing in the future, but I like them this way for now. Misty's workshop opened Monday, and I'm looking forward to concentrating on what else she has to teach me, so I will come back to the covers later. I love journal making! :)

Monday, January 2, 2012

Soft Cover Journal

I hope you all had a wonderful New Years Day and that the coming year is a very blessed one for us all.

I am starting the year off with three workshops. I will try to post and share as often as I can what I create in them, but I'm sure they're going to keep me hopping for a few weeks. I also want to finish the canvas headboard for my bed that I started before Christmas.

Misty Mawn (see my sidebar for workshop details button) generously shared two videos on journal making with us before class starts next Monday, and this is my finished project for the soft cover journal. Misty used five signatures and I think it looks better with more than the three I used, but the good thing about this journal is that I can always add more. I just happened to stop at three.

The cover is canvas and is still the plain gessoed version, because I haven't decided how I want to embellish it yet. I left the selvage across the bottom to add some interest. I used printmaking paper for the signatures, because that's what I had handy, but for mixed media something heavier would probably be better. I'm going to try it and see though. (I have a mixed media journal on the way in case it doesn't work out though).


I also used waxed linen yellow thread to stitch with. It's easy to make, and I love the way it lays open so flat to work in. I never thought I'd like a soft journal, but I do, and I've found that I LOVE making journals too.

The cat is one my quirky doodle paintings and is a work in progress. I know the stitching on the spine is a little wonky, but that's me, quirky and wonky! :)

Start the new year off by sharing a smile with someone. I'm sharing a great big one with y'all! 8>)

Tuesday, December 20, 2011

More Duck Tape Please!

I've been really busy for a few days, as most everyone else has, and haven't worked on a project in a couple of days, but thought I'd share another duck tape journal that I made out of the cardboard from a box I recived in the mail the other day.

I used turquoise duck tape, added a little washi tape, and a couple of stenciled animals, then added some old book pages that I had played with acrylic inks on, plus a little tissue paper, then held them in place with a beaded raffia bookmark tied around the middle. FUN! :)


And look! I found pink zebra duck tape at JoAnn's Fabrics/Crafts! I couldn't wait to use it, so I cut the covers from a piece of heavy textured scrapbooking paper, applied it to the covers, and stenciled two crows on the front. This one is still a work in progress.


 LOVE the pink zebra tape! The only thing is, it's on a tape dispenser and is not as heavy as regular duck tape. It's more like packing tape, more transparent, so I used a double layer for the spine. I'm just wishing I had splurged for the blue tie-dyed roll as well. Oh well, next time! :)

Would love to show you the progress on the large painted canvas headboard I'm working on, but the pics are on my camera, and I don't have time to upload them right now. I'm hoping to work on it a lot more today. I'm really liking it so far.

If I don't have time to post again before CHRISTmas, I hope you all have a wonderful holiday weekend and New Year. Thanks for visiting! :)

Tuesday, December 13, 2011

Cheetah Duck Tape Journal

Another duck tape journal. I used half a sheet of watercolor paper that I had used up excess paint on, put it together with cheetah duck tape, stamped all over it, folded parchment paper in the center, punched three holes through the center of the signature and tape binding, and hand stitched it together with hemp cord. Then I attached a piece of raffia with a bead on it to the binding top...because it was laying handy and I liked it. ;)


These journals are addictive!

Monday, December 12, 2011

Zebra Duck Tape Journal With a Pigtail

I've been at it again. Having fun, that is! Remember the duct tape journal I made in the last post, which I learned from Diana Trout? Well, Diana shared another link on Facebook from Claire's blog at http://paperpatter.blogspot.com/2011/12/lookit-i-made-book.html?showComment=1323572207382#c8990182204551292942 , who had also seen Diana's tutorial and made one of her own, adding a twist. I liked it, so you know I had to try it! :)

Claire used several signatures of paper and some kind of string to hold hers in place, instead of a rubber band. I think she also used a laundry detergent box to cut the cover from.


I used the covers off an old paperback dream dictionary and zebra duck tape for my covers. I used gel medium to stick the cat rubbings on to the covers to cover up price stickers and the front graphics, and also because they were laying within arms reach and I like them. Once they were dry, I brushed gel glass medium over the page part. The scanner didn't pick it up good, but it looks shiny and sparkly and dreamy in reality.


I used pastel parchment paper for my three signatures. Each signature consists of four sheets folded in half, so it has twenty-four pages in all. I cut three lengths of chenille yarn over twice as long as the book, and I used this because, you guessed it, it was within arm's length. lol It's a little too stretchy, but it works for now. Each length wraps around the center of each signature and the outer spine, and I tied a knot at the top. When I was finished I had six strings knotted at the top and hanging down the spine. I thought about leaving them that way, or adding beads, or making a tassel, but opted to follow Claire's example and plait them together. I like it! :)


The back cover...


You only learn by actually doing the thing you want to learn, and I'm having so much fun learning and doing all these great projects. I'm thankful and grateful to all the wonderful creative people who so generously share their knowledge, so that I can learn, and that includes Diana and Claire!

Now I'm off to see what I can do about those painted angel wings on my headboard. This is the second largest of three large paintings that I've ever done and my first in acrylics. The first and largest to date is a door, and the other is a window mural in a tiny bathroom with no real window, both in oils. This one is on unstretched canvas almost the width of a king sized bed, and it's almost ready to actually try over the bed. Right now, it's attached to a large piece of cardboard on an easel in my tiny dining room, making the traffic area a bit precarious. :/

I'll show you soon. In the meantime, I'm also working on smaller projects that I'll share as I finish them. Keep smiling! :)

Friday, December 9, 2011

Duck Tape Journal & a Penguin

I had a few minutes to kill before I left for a Dr.'s appointment yesterday, so I made a quick little Duck Tape journal that I had seen earlier in a video by Diana Trout here http://sketchbookchallenge.blogspot.com/.


I wanted to make a sample, so I tore the covers (4 1/2 x 5 1/2") from a sheet of cardstock that I had been using up excess paint on. I happened to have turquoise duct tape, which I tore off too much of and wound up having a double layer on the outside, but that's ok. It just made the binding a little stiffer. I added a piece of washi tape, just for fun, and this is the front.


The back and you can see the black rubber band holding the folded signature inside the book. I just folded some old bills and scrap paper for the inside pages. Diana's is much prettier, but mine is just a sample. Besides, I can always change the papers if I want. I'm thinking I could also use fabric. All sorts of possibilities are possible! Thanks, Diana, for sharing this! Love it! :)


This little fellow is a baby penguin that I sketched from a colored photo on Pinterest. He was so adorable that I couldn't resist. :) He's in my Moleskine journal, and the original is much better, but I like him and he was fun to sketch.

Haven't had time to paint on my large fearless painting for a couple of days. When I set it up, I intended to start it and finish it in one day, but that didn't happen. Too many interruptions. Maybe today...

Smiles. Pass them on! :)


Tuesday, November 22, 2011

AEDM Day 22-Journals or Notepads & Happy T'giving!

I haven't had time to post for a couple of days, but I've been creating something every day, although some days it's been very little.

Sunday I glued fabric over the spine of my cardboard book to hide my wonky binding stitches. I also worked on one of the pages inside, but I haven't made pictures yet. I also bought and downloaded cds by Dana Fuchs and the old original Footloose soundtrack (don't like the new one :/)

Yesterday I had to go out of town for the day, so I quickly painted the bunny that I drew on a practice journal magenta (below). If you remember he was frustrated because I messed up, thus the exasperated look on his face.

This morning I decided to take the strips that I cut off the pages to make the journals last week and bind them into long journals or notepads. I used textured papers for the covers cut to size and the papers inside are varigated parchment paper, cardstock, and pastel paper strips. I bound them, using the Japanese stab punch stitch, with waxed linen thread in purple and pink. I glued a scrap paper to the front just for fun.


The brown one is 6x12" and the blue one is 6x 5 1/2". Both are pretty thick.


The little journal over the bunny is 6x51/2" and is filled with pink parchment paper.  The bunny is a doodle on the front of a piece of cardstock folded to learn the stitch on. These were fun to make, plus I used up a lot of scrap paper. Even after I've made lists on them, or whatever, I can use them for collage, etc. How fun! :)

The next few days will be busy, as we have out of town company coming in, and we are going to our niece's house for Thanksgiving dinner with hubby's family, so even if I get anything created I doubt that I'll get it posted for a couple of days.

In case I don't get to post again, I hope those of you who celebrate Thanksgiving have a safe and happy holiday weekend. :)

Saturday, November 19, 2011

AEDM Day 18 & 19-Japanese Stab Punch Journals

I was out of town yesterday, so didn't get my creative attempt posted. I'm posting it in with today's. Yesterday I decided to study a video on a Japanese stab punch journal binding before leaving for the day. I watched the video, then folded a scrap piece of orange cardstock, punched five holes, and gave the stitching a try. Not as easy as it looked! :o I wound up with a double black stitch on the front and one on the back. Not the way it should have been. So I doodled a disgruntled rabbit and layed it aside.

We stopped at Hobby Lobby for a few minutes, where I carried around a stamp and some papers off the clearance shelf until I got so overwhelmed by all the mixed media elements that I wanted, that I put back what I had, and left the store without buying anything. That's a first! I was inspired by some things, however, that I came home and sketched out to try later, so that was some creative inspiration.

This morning I got up, folded another scrap of orange cardstock, punched five holes, and did the stitching with a scrap of yellow waxed linen thread. I love using up scraps, don't you? This time the stitching went without a hitch, except the thread is a little loose in a place or two.

I proceeded to cut two 6x12" pieces of textured asian scrapbook paper for covers, and I found a pack of variegated pastel papers that I've had for years, which I cut the same size, arranging them in the order that I liked them. I punched five holes in the covers and 23 sheets of paper (text block) and got them ready to stitch in a hurry.

One of the videos showed a small journal stitched with a ribbon, and I loved it. After much looking, I finally located the ribbon you see here, threaded my needle, and put it through the first hole (actually the second hole, but the first to stitch). It went through like a charm, and I was off and running. Not!


RULE #1 in bookbinding: Make sure the holes are large enough for what you are going to stitch with.


When I started back through the hole with the needle and double ribbon through all those pages, it was a struggle. Since the ribbon has to go through every hole about three times, and I had used an awl to punch the holes, instead of a hole punch, it took me hours, instead of minutes to finish the binding, and I have the blisters on my thumb and forefinger to prove it. I was exhausted to boot.

A sane person would have probably backed up at the first hole and re-punched the holes, but I didn't listen to that little inner voice to do so and trudged on ahead. lol  I do love the ribbon binding though, despite some of the stitches being a little loose. It takes practice, and I learned a valuable lesson the hard way.

I liked the 6x12" journal, so I cut two 5x5" covers from a scrap of textured paper, plus about a dozen sheets of pastel pink and green parchment paper and made a small journal stitched in black, which I am happy to say did only take a few minutes, and, as far as I can tell, is stitched without a bobble. I am so proud of myself and what I learned, and that was my adventure for today! :)

Thursday, November 17, 2011

AEDM Day 17-Another Journal Made!

Daphne, I think, is the name of the woman I learned coptic stitching from and her video is easy to see and follow. This is the link
http://www.youtube.com/watch?v=cXdK74_SCZQ&feature=related . The first few seconds are a little wacky, but the instruction is good, and she lets you know that she's just learned this herself from another utube video.

Okay, those of you who saw my first attempt at doing the coptic stitching on the journal I shared in yesterday's post, who are familiar with this stitching, saw a glaring mistake. I knew I made boo boos, but didn't catch this one until this morning. There aren't supposed to be any long stitches on the cover. :o Luckily I had run out of thread in the middle of the first signature (last one sewed in) and had to splice it. So I took the stitching out that far back and fixed the mistake. I like the black stitching on the cover, but, unfortunately, the way I had it wasn't holding the cover securely to the signatures. It's good now. I'm learning. :)

I made another journal 5 1/2" x 5 1/2" this morning, after watching the end of the video again. I used the bristol board covers that I messed up yesterday and salvaged enough for the covers for this one. This time I cut up a sheet of watercolor paper that I had been swiping excess paint on and glued the pieces onto the covers instead of painting them. I used yellow ochre waxed linen thread for the stitching, I left the threads hanging out for a purpose, and here is the final book, ready to play in.


There are five signatures, with five sheets each folded, in this book. The middle signature is off white cardstock, and the other four are pastel colored parchment paper.


First page, ready to write or draw on. Plus, I had scraps of the painted watercolor paper to make two bookmarks to match the covers.


Both journals, with the stitching corrected on the larger one. See? No long black stitches on the cover! I got distracted just as I was finishing up yesterday, but that's no biggie. It was easily fixed. I LOVE making these and can see all sorts of possibilities.

I want to make a few more of these, then I want to try the Japanese stab binding. A whole new adventure!

Wednesday, November 16, 2011

AEDM Days 15 & 16-Paint Blots, a Handmade Journal, and a great Tool

I tried a few more pages of ink blot background pages in my Moleskine, only this time I remembered to gesso the pages with clear gesso first and I used fluid acrylics instead of ink. I did these plus I added some random stuff to pages in another journal yesterday, despite being sick. I didn't feel like posting last night.


These were fun. I need more practrice, but I can see images in all of them to build on when I take the notion.

I've been wanting to make a journal with coptic stitch binding for a long time, and I decided that today was the day. I followed a Utube video tutorial, and I'm sorry, I don't remember the lady's name, but it was very easy to follow her. I made lots of boo boos, but I was learning the process, so I'm pleased with the outcome.


It actually took me twice to get the covers cut. I cut them out of bristol board and my rotary cutter blade is dull, plus I can't measure for nothing. :/ I totally ruined the first set. These are a little wonky still, but I decided they'd work. I made a paper template for the holes and punched them with an awl, then used spray ink on the covers and added some faint stenciling with lace and a doily. I'll add a drawing or something when I actually start using it later on.


I found two packs of different colored cardstock that I'd forgotten about, so the pages are varigated. Each section (signature) has eight doubled pages of cardstock, and I put five signatures in to the book. If I had it to do over, I would use thinner paper for the first time to learn on though. I love cardstock, but the stiffness of it made it a little difficult to handle while sewing. I used waxed linen black thread also, and this is how I layed the sections, after punching the holes (5 in each section), to sew them.


Then I followed the tutorial, pausing when I needed to, and sewed the sections and covers together. This is the finished book. There are things I know to do differently on the next one, such as the hole spacing should have been a little further apart, and the cover didn't want to lay flat, because I didn't get the paper folds creased flat enough, but this one will work, and I learned. That's what mistakes are for! :)


One Christmas several years ago I asked for tools, because between my husband and my dad I could never find what I needed. I got tools, and my dad also got me this little anvil. I laughed and asked what was I going to do with it at the time, but it has been one of the handiest creative tools I have, plus I think of daddy every time I use it. Here it's pressing my book into submission. It's also good for a lot of other things. One day I'll do a post about it. :)

So these are my creative efforts for the day. You can click on the AEDM 2011 badge on my sidebar and see what all the other players are sharing. Some amazing things everyone is doing!