PERFECTLY IMPERFECT-I may not be the best at what I do, but Nobody has MORE fun trying than I do! :)


Showing posts with label Needlefelting. Show all posts

Friday, April 6, 2012

Shopping Trip and WIPS

I actually typed this whole post a few days ago, only to discover I was having internet problems and blogger hadn't saved most of it to publish. Interruptions kept me from finishing it until now. Hopefully, I will get it posted before I get interrupted again. :)

Tuesday, Mar 27, was our 42nd anniversary and hubby and I had a spontaneous day out, just the two of us. We couldn't decide what we wanted to do, if anything. We had to take some stuff to the bank in town, so after we dropped it off, we just started driving northwest and wound up an hour and a half later in one of the nearest large towns (or small city?) to us in a huge shopping center. The drive was beautiful and we chatted and laughed as we drove, just enjoying being together.


I had received a Hobby Lobby gift card for Christmas from our nephew and his family, so we went in Hobby Lobby for a few minutes, where I spent the gift card, plus a couple of extra dollars, on a crop-a-dile II. Then we had a delicious lunch at Ruby Tuesday's, which we relaxed and took out time with.


After lunch, I went to JoAnn's Fabrics while hubby went to a sporting good store. I found way more great things than I could afford, but I came home with a sheet of plastic canvas for stenciling, etc, a liquid gold leaf pen, a fabric bundle, a sample pack of glitter, a small silk pouch, mama some pipe cleaners, and a CPS magazine.


We enjoyed frozen yogurt at Sweet CeCe's, which was do-it-yourself and the NY Cheesecake yogurt with almond slivers was really good. That's the only shopping we did in the center, but on the way out of town, we stopped by a Goodwill store. It took some digging, but I found an unopened box of Anna Griffin print-it-yourself wedding invitations with background paper of navy/cream, invitation cards of cream with silver borders and rsvp cards to match, with navy ribbons and two sizes of envelopes. 25 of each. I also found two bundles of nice napkins, also unopened, and some unopened Disney stamps, all for about $8.00!


Close up of the smaller napkins. Metallic gold borders with black/white drawings of the four seasons, and the words are in German. There are about 25 of these. How cool is that?


The larger napkins, also about 25 in pkg, are about hankerchief sized and have a cloth like feel to them. I love the colors and vintage look! I have already used both napkins on journal pages, plus I have plenty to share in a stash swap when one comes along. I loved finding these treasures!

The drive home was beautiful also, and we got here safe and sound, plus hubby surprised me with a copy of the Cloth, Paper, Scissors book. It was a good day of bonding and we're grateful to still have each other and that we were able to enjoy the day just enjoying each other's company.


 These are a couple of projects in progress. The one above is a sleeve for my e-reader. I needlefelted some yarn samples onto the edge of a piece of needlefelted material, lined the inside with a colorful turquoise, black, and white cotton cat print, and used bookbinding thread to stitch the edges together. I still need to attach some sort of fastener to the top to keep the reader from sliding out in my purse, and I may or may not add an embellishment to the front. The needlefelted material is thick and soft enough to help protect the reader from bumps and bruises in my purse too.


I had a 9x12" signature left over from the journal I made for Misty Mawn's class, so I cut it in half to make two smaller signatures. I used a scrap of canvas for a soft cover and stenciled on it with modelling paste, let it dry, and rubbed over it with titanium buff fluid acrylic paint. Enough of the pink was still wet enough to mix with it, giving it a pink tint.

The signature already had five holes punched in it, so I just went with it, and, using bookbinding thread, stitched them in in the uneven holes, giving a wonky look. I plan on carrying this one in my purse, so that's ok. It'll also be light, and if I need more signatures I can add them.


Since these pictures were made I practiced using the crop-a-dile to put little red eyelets on the edges of the closure. I kind of messed up the ones on the front, but I finally got the hang of it on the back ones. :) I tied a piece of the bookbinding thread through the center eyelet on each side, then tied it in a bow. I also added the title, Jots and Tittles, in black marker on the front. I will do some more to the covers when it tells me what else it needs. Right now I'm thinking I need to take some of the buff paint off the dancing ladies for a start?

Hope you enjoyed seeing what I came home with and some of what I'm working on. I sure am enjoying playing with everything. :) 

Sunday, March 27, 2011

Stash Swap & Sneak Peek at Felted Doll 3

A few weeks ago I participated in a stash swap at Creative Artitudes on Facebook with Cynthia Hanna hosting. This was my first stash swap ever. In fact, I had participated in only one other swap before, and it was an inchies swap a couple of years ago. 

In this swap, the participants were put in a list. What we chose to send was to be intuitive about what the other person might like. The person above you sent you some of their stash that they no longer wanted or needed, and you sent the person below you some of yours. There was no limit on how much or how little, only a $5-7 postage/mailing limit, and a deadline for getting the packages mailed out.  


I just had to share with you! It was like a Spring Christmas when I opened my package from Erin, and I hope she doesn't mind me sharing. Just look at all the neat stuff she included, much of it co-ordinated in spring colors. This is a picture of as much as I could get into the picture and still show a portion of it.

She sent embossing glitter powder! I've never used embossing glitter powder before! Of course, I had to open it and examine this wonderful stuff. Later that afternoon, in the Dr.'s waiting room, Mama noticed my face was all sparkley. Oh, well, I needed some sparkle! :/


There are decorative papers, tags, some gorgeous handmade papers, collage ephemera, the cutest kitty stamps and ink pads, an adorable stamped rabbit finished project with stuff for me to make one, various kinds of stickers,


lots of beads, buttons, an oragami album project, ribbons, pretty tape, heart-shaped paper containers to assemble and decorate...and I know there's more. I am still so excited over my "new to me" stash, and anxious to put it to use, merging it with my other stash and projects. I also look forward to playing with the things I've never tried before. Thank you so much, Erin, for all these wonderful items that you shared with me! I will think of you every time I use any of them.

Thanks Cynthia! This was so much fun! :)


OK, this has nothing to do with the stash swap at all. I just thought I'd share a sneak peek of Felt Doll #3 that is now in progress. I'm trying something new with this one, as she is seated. This is only the needle-felted core form, and as you can see she is missing a foot, one and a half arms, and a face, but she's getting there. I don't know if you can see, but she does have indentions for eyes and mouth, and a small bump of a nose. I haven't decided on her outfit yet, but her personality is beginning to emerge. I have to say that she's a patient soul. She hasn't griped once about it taking me so long to complete her. :)

I have several projects in progress, and I start another round of the 21 Secrets workshops on April 1, which I am so excited about. My main project right now is to clean off a spot to work in. :/

Have a wonderful creative week, and I hope something on here made you smile! :)

Monday, March 7, 2011

Meet Memaw! Needlefelted Doll #2

I've been birthing another character through wool and needlefelting. I have no preconceived ideas in mind when I start. I just let the characters evolve and learn as I go, my favorite way to work. :) This is my second attempt at felting a doll, and I learned much from her.

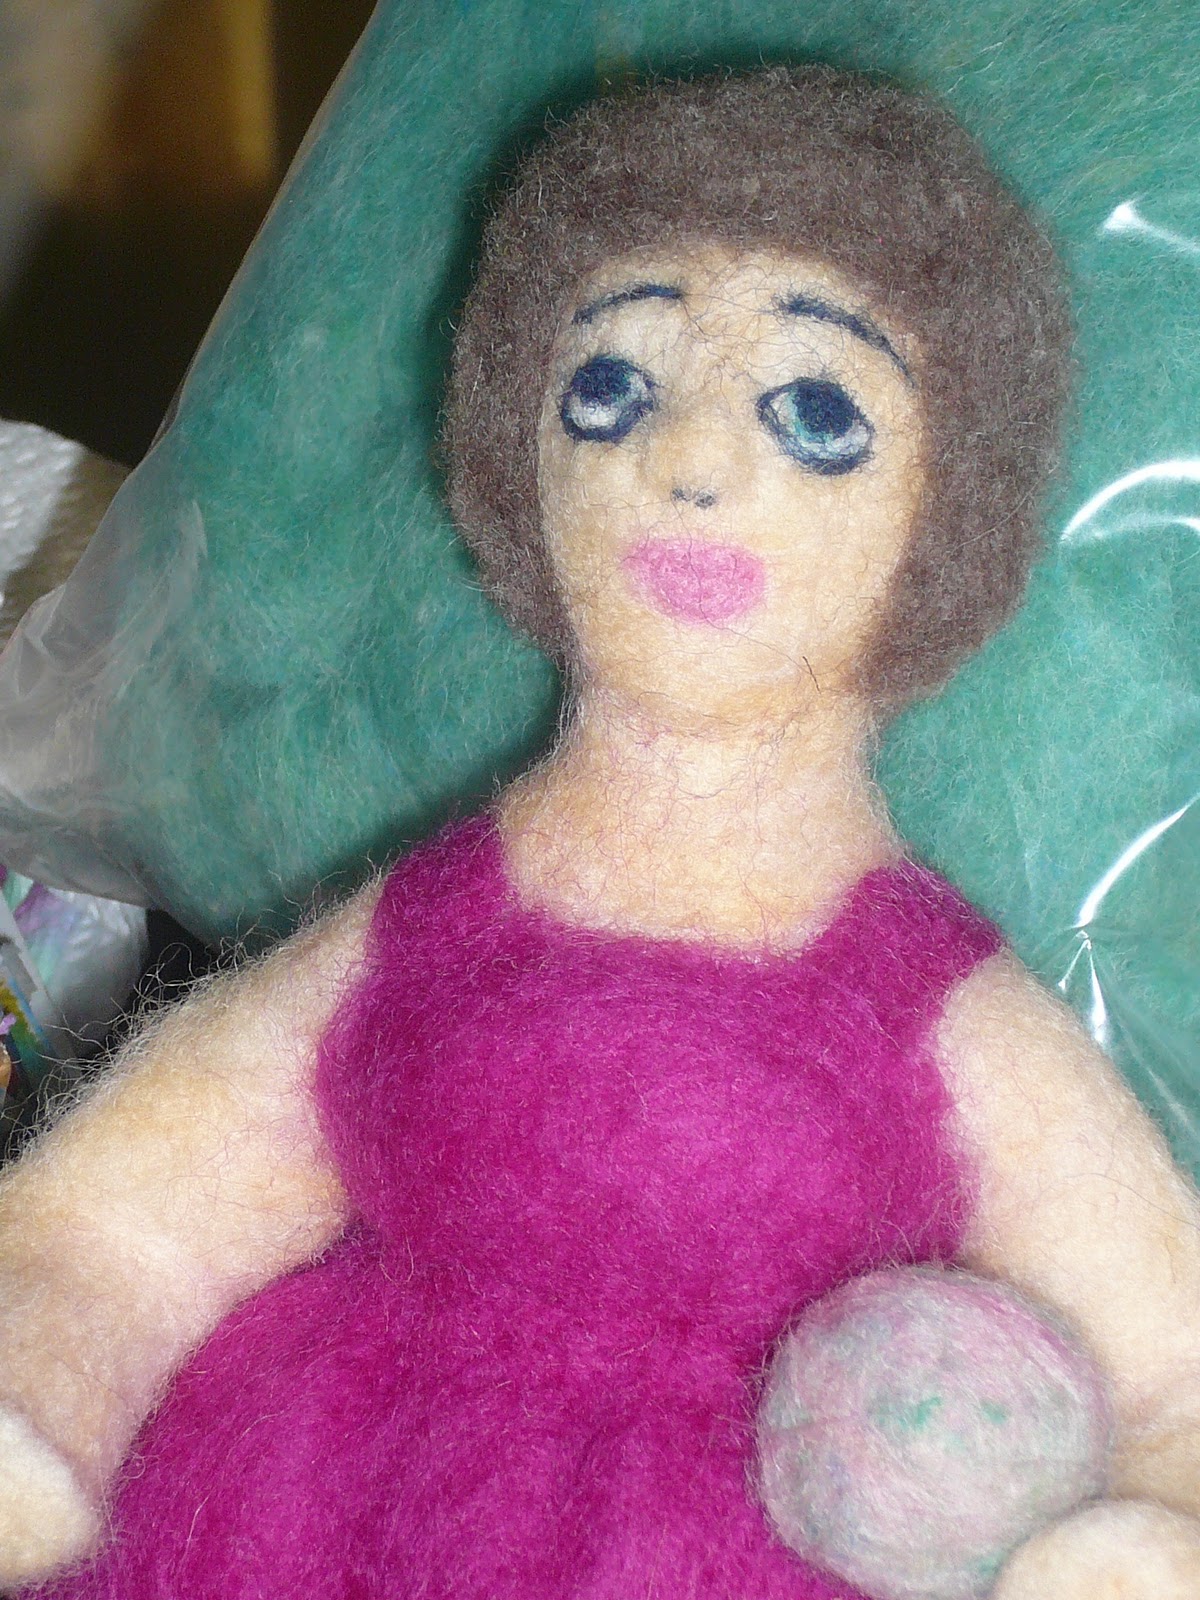
Meet Memaw! Memaw has lost a hundred pounds and is on a quest to lose the rest of her chunky butt. She is dressed in her exercise clothes and has her medicine ball, ready for the gym.
Memaw is about 10" tall, and since I haven't really figured out how to felt clothes seperate from the body yet, I felted her pants, top, shoes, & sox to her body. This and the following 3 pix are before I tackled her face and hair, but she already has personality, doesn't she? This is before...

Behind...

Side, see her chunky butt...


Three-quarter, notice her round belly, still faceless and hairless...

Memaw has hair, and she can see, smell, and talk now!...

I felted my first piece of seperate clothing in the skirt. It's a little thick, but I did it, it has a slight gather to it, and it's felted onto her top to make a little dress, because Memaw doesn't like for her chunky butt to show in gym class. I also added metallic embroidery thread shoelaces to her workout shoes, and gave her an exercise medicine ball to workout with...

Side view, I haven't given her fingers, because they're tiny and tedious, and I haven't had the nerve to do them yet. :/

Three-quarter...

Close up of Memaw's face. When I got her face and hair on, she looked like somebody's memaw to me, hence her name. As much as she wants rid of the rest of her excess pounds, she HATES to exercise, hence the facial expression. :/

Memaw and Selma (Doll #1-see label needle felting) have spent the afternoon chatting and becoming friends. They are finding out that, despite their differences, they have much in common. They can't wait to meet Doll #3, already in progress, and perhaps a pet or two...

There's also an explanation of needle felting under that label at the bottom of the post. It's a lot of fun, meditative, and addictive, and I can't wait to see the next character evolve from the head I already have formed!

I hope you enjoyed meeting Memaw as much as I enjoyed creating her! She has a lovely personalilty! :)

Monday, February 28, 2011

What I'm Working On...IF I Can Find the Space!

 I'm sitting in front of my laptop pondering where I'm going to make space to work today.  My current studio/playroom is our dining room.

Just for fun I thought I'd show you what I'm facing as I sit here. Sorry about the picture quality. I forgot to turn the flash on, and there's a flouresent light overhead with a yellowish tint to its light. Needless to say we never use the table for eating! LOL


 Here are some of my ABSOLUTELY favorite tools that I always have within arm's reach. Laptop, Mp3, gum, scrap paper for notes, post its, and COFFEE. Art Journal page for a screen saver! WIP felt doll #2 guarding my coffee.


 Still to my right and up a little, WIP felt doll with the rest of her top laying near on a box of wool felting supplies, waiting patiently for me to get back to them. Behind them an old computer desk full of books, beading, stamping, half-finished paintings and projects, and misc.


 Straight ahead is my sewing machine on the other side of the table with a stack of art journals in progress between me and it. I've been sewing on some of the journal pages, although I did repair two pair of hubby's pajama pants while I was at it. Between the journals and the machine are piles of paint and stacks of background and misc papers, plus files of stuff. My water container and brushes and my styrofoam plate palette is on the left side of the table. The painting corner to the left I'll explain on down the post.


 To the left of me is my printer on a TV table with my drawing board laying on top of it, where I've been doing my larger painting. I know, NOT a good idea! :/


Still to my left, two large cheap watercolor papers that I've been working on for the last 2-3 days for backgrounds. I've gessoed and painted both sides of each page. Also a zentangle that I started last night in my Moleskine journal while watching TV with hubby. Great alternative to eating! Behind is a portrait of my little Pekingese, Kibbles, who has been gone since 1997. I can't bring myself to finish it.

I'm not going to show you the view from the other side of the table or the floor. But I can scarcely believe it myself. :o It is like getting through a mine field to get to the other side of the table, and any day now I'm going to straighten it up. :)

I have a very large studio upstairs, but it has steep stairs (and I'm prone to falling), it costs too much to heat and cool it, plus since hubby retired he likes me down here with him, so I'm relagated to our very small dining room, but I'm blessed to have a space at all, so it's all good.


 This is the whole sheet of the corner showing in the picture above. The light glared on one end of it and the following pictures, but you get the idea. As I said above, these are big sheets of cheap textured watercolor paper that I've randomly applied liquid acrylics and inks to, using brush, bubble wrap, sponge wedge, etc.

I planned on cutting this sheet up for collaging or journal pages, but a pinkish face shape appeared on the left side and I've. since taking the picture, painted in a face, shoulders, and hair, and I've lightened up and changed the background. Right now I'm liking it, and I'll show you when it's done, unless I really mess it up, and it still winds up in pieces. I did sponge paint the back of the paper with a sea sponge, just in case. :/


The second sheet I used mostly acrylic inks on. I drizzled them on then used an old credit card to try to spread them. They soaked into the paper pretty fast. despite the gesso, thus the blurred effect. I used a brush handle to draw squiggles and stuff in the damp ink. It does look better in person.


This is the back of the previous sheet, using acrylic inks, liquid acrylics, bubble wrap, and a sponge wedge. This sheet will most likely be cut up for journal pages, or atcs, or.......

So these are some of the projects I'm working on, plus I started two more zentangles while visiting with company yesterday and finished one of them last night while watching TV with hubby. I'll show you those in a different post.

By the way, the answer to the riddle about a space to work? I stand up to paint on the makeshift table to the left, and I either hold my sketchbook on my lap or take it to the living room to draw or zentangle, I take my needle felting to the living room and hold it on my lap, and I set the sewing machine down in the floor to glue stuff in my art journals. I can also take those to the living room to write or draw in. It would be much easier if I could work on only one project at a time, but I can't. I have to have a variety of projects going at once, or I get bored. It's not about the finished item for me. It's about the learning and doing of it, the process of figuring things out. But I will eventually finish them...

I'm so glad you visited, and I really hope something here made you smile. Now to get back to one of those fun projects... :)

Thursday, February 17, 2011

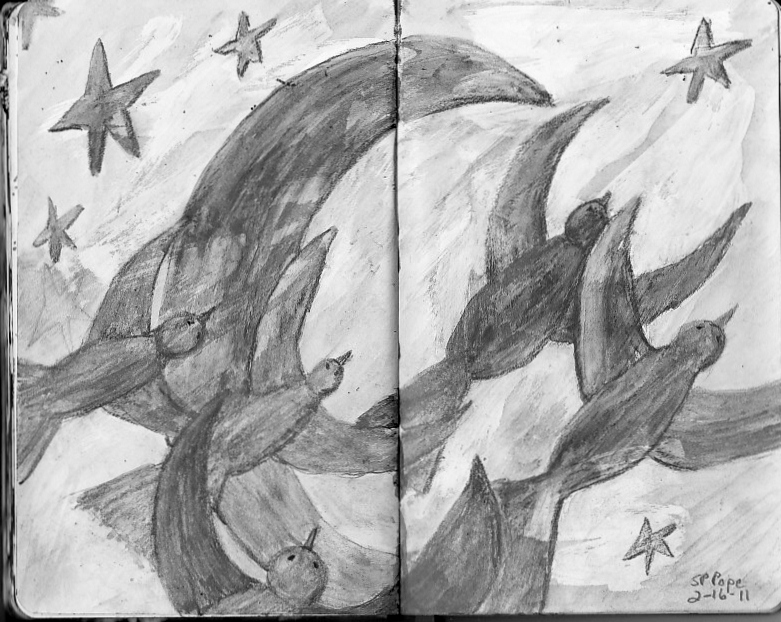
Doodles, Crow and Cow Sketches, & A NF Sampler

All of these were done with my sketch and wash pencil in my Moleskine, practice and play.
 I like to doodle while watching TV. The other night we were watching Blade II, and I did quick sketches of patterns in the background. They had to be quick; there's a lot of action in the movie. :)
I sketched a small version of this in the doodles above while watching Nights in Rodanthe. It was a black metal sculpture, sort of a room divider thing, in the movie, and it was gorgeous. So I decided to try a larger version in my sketchbook. I had already brushed on some leftover white gesso onto a portion of the pages, so I drew over it, then went over everything with a damp brush. It didn't turn out quite like I wanted it to, but there is a little charm to it, I think. :/

Clara Nell was sketched from an original photo, and is my first attempt at sketching a cow with a pencil. I tried one in paint when I first started painting, but it wasn't solid black like this one. Black objects or animals are very hard for me to shade. I decided not to use a damp brush on her. I left well enought alone, for once! She's not perfect, but she's mine, and I learned that I could do it! :)

I got in an order from Joggles with some new colors and textures of felting wool a couple of days ago. I wasn't quite ready to start another doll just yet (first doll in post before this one), and I didn't want to dig out something denim to try needle felting on, so I made a sampler, of sorts, on a square of wool felting that I had handy. It only took a few minutes, and it was fun!

I have way too many hobbies and way too many half finished projects and too little time! LOL

Tuesday, February 15, 2011

Meet Selma!

So a few months ago, after seeing some needle felted animals online, I thought I'd like to try it and bought a little simple kit at Hobby Lobby. It was really easy, and when I was finished, I had a flat flower applique (see under needlefelting label on sidebar). I also tried a little free-form flat piece. I loved it and was hooked!

Right after that I got involved in some art journal workshops and since I only had the needles and a minute bit of yarn left from the kit, I concentrated on my art journals. However, I acquired more supplies from Hobby Lobby and an order to Joggles online during this time, and two or three weeks ago I watched some Utube videos on needle felted dolls, then jumped right in to making one of my own. From a simple flat flower to a doll with a needle-sculpted face is a big jump. But that's me, for ya! :0

Anyway, below is my 3rd needle felted project and my first doll. Don't know why I named her Selma. That's just the name that popped into my head when I looked at her, so I guess she introduced herself that way. She certainly wound up a character! :)


Selma in her birthday suit, front: I began with roving wool and a felting pen to form her body. The head was formed and felted to the body. The arms and legs were formed and joined at the knees and elbows, then to the body, then her butt and breasticles were built up with the wool to create the basic figure.

Selma behind...literally!

Closeup of Selma's face with a little sculpting where her features will be...
AND
introducing
"Don't Hate Me Because I'm Beautiful!"...
SELMA!

From Behind...
I didn't want to figure out how to needle felt her clothes just yet, so I just needlefelted them directly to her body, boots and all. I only had a few colors of felting wool to work with, hence the color combo.

Three-Quarters View
Notice the Pink strip of hair (I know, it looks whitish in the sunlight). She is posing on the car bumper and she is light as a feather. The wind kept blowing her over and twice she fell off the bumper into the dead leaves. I tried to get her cleaned up. Luckily, nothing was broken...

Full View--13 1/2" Tall
Not the best face and hair, but, hey!, it's my first time to try sculpting a face. Besides, you can't say that she doesn't have character! LOL

I realized after I made the pictures that I made them before adding her jewelry and her nostrils. Also, in the event that you think her hands look odd. The thumbs and each finger has to be formed and felted on individually, and I didn't want to take the time just now, so she has thumbs, no fingers. Just pretend they're fists! LOL

My tools: The bubble wrap is only to keep the felting mat (brush) from sliding around while I'm working, but all you need is roving wool for the core, wool felt in colors, needles, and a felting mat.

The needles are extremely sharp with burrs on them to tangle the wool into itself, and I can tell you from experience that if you jab your finger with them, it hurts. :/

I am in no way an expert or a professional, but I LOVE needle felting. Other than making sure your finger is out of the way where you're holding the wool, it's very meditative, and an easy thing to do while watching TV.

There will be other projects coming. I've ordered more colors of wool, and I'm already planning another doll, plus I want to do some felting on denim, so stay tuned...

Wednesday, May 19, 2010

Learning Needlefelting 2-ATC?

Since this month's theme at Creative Every Day is intuition, I guess I can call this an intuitive yarn painting, of sorts.

I wanted to do some needlefeltting this morning, and since I didn't have any backing material handy, I decided to try felting yarn to yarn. I took the black yarn that was left from the kit project I shared before and pulled and tangled it into a flat shape and layed an atc template over it.

I started out to make a landscape atc by felting the blue and green yarns onto the black, but then it called for a pink stripe. I liked it and was going to leave it that way, but then the muse whispered, "If you felt it on the back too, it will lock it together better."

Okay, the black backing had pulled apart some when I pulled it off the foam punching block, because the needle punches the yarn into the foam, so this sounded like a good idea.

Memo to me: Get a bigger and better punching block-the brush type which doesn't hold onto the yarn

So I turned it over and happily punched away. It did lock together better, but now there were lots of black fibers sticking through the pastel colors (the lesson here is not to use a dark backing under light colors). I added more blue, green, and pink yarn to the front, but still could see the black showing through. I kind of liked it like that, except that there was a small black cluster over the pink and down into the green that looked sort of like a swarm of bees, thus the yellow wispy piece diagonally across the front. Ms Muse told me to do it. ;)

Because I desperately need to do some cleaning, I'm calling it finished, for now. If I trim the black edge off it and add a decorative stitch around the edge it's an ATC. I'm kind of liking the black edges, and as I sit here looking at it, I see all sorts of possibilities, like maybe beads or charms or decorative stitching added...

Anyway, just thought I'd share what I'm playing with right now. Thanks to all you who inspire me every day by sharing whats on your work table! :)

Monday, May 17, 2010

Learning Needle Felting

I've been learning needle felting because I needed ANOTHER hobby. LOL

Seriously, I saw some little needle felted animals online and just fell in love with them, and I naturally thought, "I can do that!"

I've been looking at you tube videos and other instructional sites and decided to give it a try. The other day hubby and I were near a Hobby Lobby, so I went in to see if they had the tools and roving wool. They had sold out of several things, but they did have a couple of these little kits left for $5.00. It contained everything I needed to give needle felting a try, two  punching needles, black and white yarn, a foam block to punch into, a pattern already stamped onto a pocket, and simple instructions.

I started working on it that night and then skipped a couple of days and finished it in just a few minutes today. Now that I have the hang of it, I could do this flower in probably half an hour. It goes pretty fast. I love it! It's one of those projects that is conducive to listening to my mp3 player while sorting out the stuff swirling around in my head. It's a good frustration venter too. You do have to watch your fingers though. The needles are very sharp and have a little burr on the end that tangles the yarn when you punch it through.

Basically, you tear off some roving wool yarn, put it on your pattern and over the foam block, then with one or more needles held straight up, you jab the needle(s) straight up and down on the yarn into the block, thus fastening it to the base. My kit had the pattern on a pice of white felt, which could be used as a pocket on a felt purse, or you could cut the flower out and applique it to jeans, pillows, whatever. I chose to cut it out to applique.

The flower in the kit, as you can see, was supposed to be black with white. However, since I had bought a small  bag of different colored yarns, I decided to make mine white with pink. I'm considering adding a pink tinge around the petal edges. The top of the flower has a felted feeling to it and the underneath is fuzzy.

I am anxious to try some animals, but I need a little more practice first. I did okay on the flower for a first attempt and I learned, but it takes a little practice to get the density right, so it's a little lumpy. Like me! :)

I LOVE learning new things, and this was fun, so I thought I'd share it with you all...